img { filter: brightness(1.2) contrast(1.2) saturate(1.2); }

OnTheClock Payroll is here! Take the hassle out of payroll and complete the process in minutes, not hours. Learn more and sign up today!

Setting Up Paid Time Off (PTO)

Help
Need more help?
Submit a ticket
Was this article helpful?

Overview

OnTheClock makes it easy to track paid time off (PTO). In this article, we’ll cover everything you need to know about setting up PTO for your organization. Please note you must log into your account from a browser to set up PTO. Here’s an explanation of the basic rules for PTO settings — we’ll explain more on how to set up the rules later. Learn more about how to use these rules here. 

  • “Allot X hours per year” — A set number of PTO hours are given for the entire year. 
  • “Accrue X hours per regular hour worked” — PTO accumulates for each hour worked, excluding overtime. 
  • “Accrue X% of regular worked hours” — PTO accumulates for each hour worked, excluding overtime. 
  • “Accrue X hours per pay period” — PTO accumulates for each complete pay period.*
  • “Accrue X hours per every hour worked” — PTO accumulates for each hour worked, including overtime. 
  • “Start Accruing On” The date PTO allotment or calculation begins. 
  • “Stop Accruing On” — The date PTO allotment or calculation ends. 
  • “Previous Balance”  This signifies hours carried over from the previous system or year and can be a positive or negative number. 
  • “Max Hours Per Year” — This sets a limit on the amount of PTO hours that can be accumulated between the start and stop dates. 

*Note: If selecting “Accrue X hours per pay period” and the “Start Accruing On” date is in the middle of the pay period, PTO will not accrue until the next pay period.

Setup

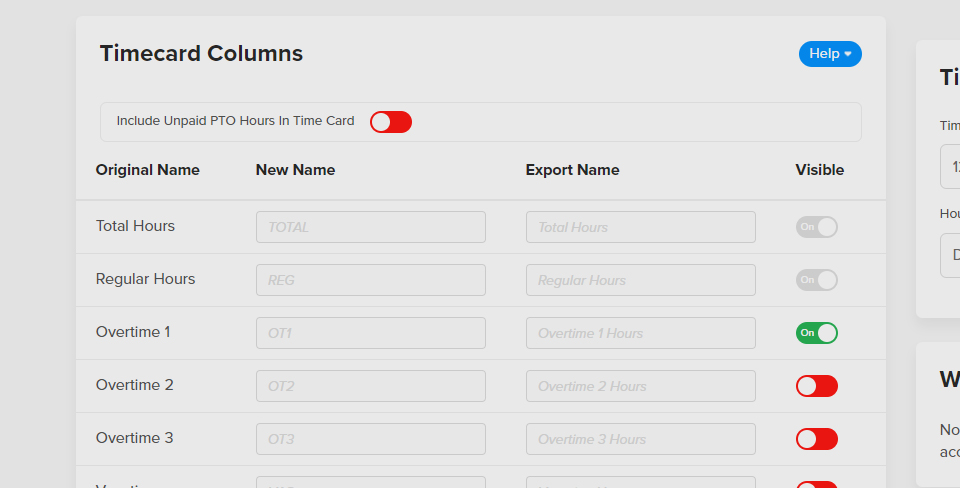
By default, there are four categories for PTO: vacation, holiday, sick, and personal. Categories can be renamed to fit your company's policies. You don’t have to use each category. 

(optional) Change PTO Categories to Match Policy

  1. Step 1: Log in to your OnTheClock account via a browser.
  2. Step 2: Navigate to “Settings ,” then “Time Clock Settings”.
  3. Step 3: Click “Advanced Settings .
  4. Step 4: Under “Time Card Columns,” locate the type of PTO you wish to rename.
  5. Step 5: Type your preferred category name in the “New Name” column.

PTO

Set Up PTO for Individual Employees

  1. Step 1: Log in to OnTheClock as an administrator via a browser.
  2. Step 2: Navigate to your “Employee tab.
  3. Step 3: Locate the employee you’d wish to modify.
  4. Step 4: From the employee’s profile, select “PTO Settings .
  5. Step 5: Set your PTO rules for this employee and Save.

Set Up PTO for Multiple Employees

There are two ways to add PTO to multiple employees: Employee Groups and Bulk PTO.

By Employee Group

The Employee Groups option is best utilized if you have a group of employees who all receive the same PTO allotments or accruals. Applying PTO to an employee group will add set PTO rules for all employees assigned to the group at once. 

  1. Step 1: Set up your employee group.
  2. Step 2: Navigate to your “Employee Group” page (under Settings).
  3. Step 3: Click on “PTO Settings .
  4. Step 4: Set your PTO rules for this employee group and Save.

*Note: If you update PTO in a group but an employee inside the group has special PTO needs, you will need to customize that employee's PTO details individually.

Bulk PTO

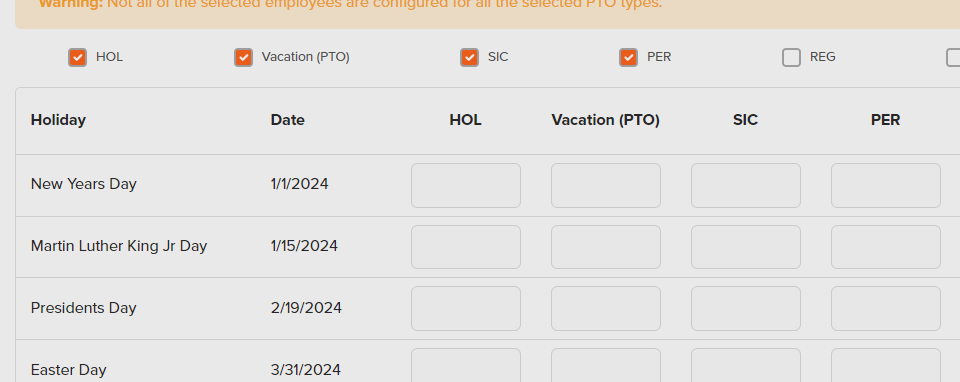
Bulk PTO can be utilized to add holiday hours for all employees at once. This can also be used to apply OT2 for employee working holidays at once if you know in advance. 

  1. Step 1: Click “PTO , then “Add Bulk PTO.”
  2. Step 2: Under “Select Employees,” check the relevant employees.
  3. Step 3: Under “Select year to add PTO,” set the year.
  4. Step 4: Specify hours to be added. By default, this is set to holiday pay.
  5. Step 5: If desired, click “Show All” to show all types of time categories.
  6. Step 6: Enter the hours in the appropriate boxes, then click Save PTO.

Bulk Add

Carrying Over PTO (PTO Renewal)

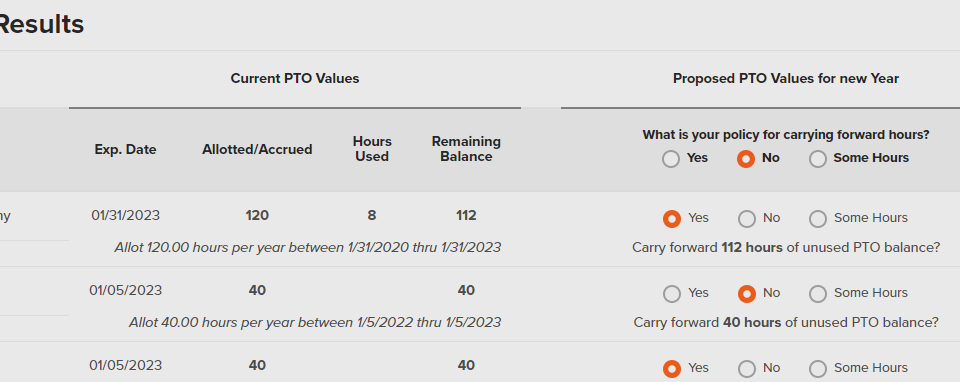
You can customize carryover PTO based on your company’s policy. By default, PTO will not carry over. Before renewing your PTO year, we strongly recommend you download the current PTO year.

  1. Step 1: Log in as an administrator on a browser.
  2. Step 2: Click “PTO , then select “PTO Renewal.”
  3. Step 3: Toggle “Renew PTO” for the relevant employees.
  4. Step 3: In the column labeled “Proposed PTO Values for New Year,” set your policy.

*Note: If you need to update an employee's allotted or accrued value, you will need to visit his or her profile to update the allotment or accrual amount.

Renewal

If you select “Some Hours” as your policy, you can determine how many hours to carry over for that employee. This amount cannot exceed the employee's end-of-year PTO balance.

Retrieving Previous PTO Balances

  1. Step 1: Log in as an administrator on a browser.
  2. Step 2: Click “Settings ,” then select “Time Clock Settings.”
  3. Step 3: Scroll down and click “View Raw Activity Log.”
  4. Step 3: Check the box “Employee Record Updates & Deletes.”
  5. Past balances
  6. Step 4: Review the PTO modifications.

*Tip: You can use CTRL+Print Screen to save this information in a PDF.

View PTO Balances

  1. Step 1: Log in as the administrator or manager.
  2. Step 2: Click the “PTO” icon.
  3. Step 3: Select “PTO Summary.”
  4. Step 4: Under “Current PTO Hours,” select the name of the employee you wish to view.
  5. Step 5: The balances will be displayed below, and you can also view a detailed summary of the PTO used.
  6. Step 6: Click the “Excel Export” button near the right for a report or view on the screen. The export will show the rules set, balance, and dates used for an individual employee. 

In the OnTheClock mobile app, you can set up individual employee PTO rules. You can also manage viewing balance. For a more advanced setup, you will want to complete this on the web browser.

PTO Set Up for Individual Employees

  1. Step 1: Log into OnTheClock as an administrator or manager.
  2. Step 2: Tap settings and then tap employees
  3. Step 3: Tap on the employee you'd wish to modify.
  4. Step 4: Scroll to “PTO Settings”.
  5. Step 5: Set your PTO rules for this employee and Save.

View PTO Balances

  1. Step 1: Log in as the administrator or manager
  2. Step 2: On the dashboard, scroll down to the Paid Time Off section and Tap “Paid Time Off.”
  3. Step 3: Select the employee to view the balance.
  4. Step 4: From here, you may add a request by clicking “Request” and considering “Pending,” “Approved,” or “Denied” requests. 

What to Expect

Once your PTO is set up for your business, you can easily maintain and manage employees' PTO policies. Renamed PTO columns will show up with the new names inside the PTO tab for employees and within your time card display. Renamed columns will also show on downloaded or printed time cards. If you apply your PTO accrual rules later in the year, this feature is retroactive and will look at all the hours worked during the accrual period to calculate employees' PTO based on the entered value.

Troubleshooting

A
Max PTO only applies to accrued PTO — not carry-over PTO. Any PTO added as a “previous balance” will be added on top of accrued or allotted hours. So, if your max PTO is 120 hours, and an employee carries over 10 hours of PTO from the previous year, he or she can accumulate a maximum of 130 hours of PTO.
A
If you’d like carryover PTO to count toward your maximum PTO, you’ll need to adjust your maximum PTO amount. For example, if you’d like to carry over 10 hours of PTO and the max PTO is set at 120 hours, set your maximum PTO for 110 hours. This way, the accrual will stop at 110 hours, leaving your total as 120.
A
To download all of your employees’ PTO balances, navigate to the “PTO” tab and select “PTO Renewal.” Next, under “Due for Renewal,” select “All (All Employees).” Finally, click “Export Balances.”
A
Yes. This can be accomplished using the “accrue X hours per every hour worked” rule because this rule incorporates overtime hours. Follow these steps: Step 1: Select an employee from the employee icon. Step 2: Navigate to the "PTO settings" tab. Step 3: Under the "SIC" heading, choose the rule "Accrue X hours per every hour worked." Step 4: Calculate the accrual rate by dividing the state rule (i.e., one hour for every 30 hours worked). Step 5: Round the result to the fourth decimal place (i.e., 0.0334). Step 6: Enter the rounded value (i.e., 0.0334) into the accrual box. Step 7: If required by state law, specify the maximum hours allowed per year in the "Max Hours per Year" box.
A
We have a handy calculator that can help you calculate your accrual amount, as well as an explanation of how to calculate the values for your PTO. Read more.
Need more help?
Submit a ticket

What's Next

PTO Balances

Learn how to view balances for PTO.

Holiday Pay

Learn more about setting up PTO for holidays.

PTO Requests

Learn more about how to approve or deny PTO requests.