QuickBooks Desktop Importer

Help
Need more help?
Submit a ticket
Was this article helpful?

Overview

OnTheClock’s QuickBooks Desktop Import tool helps you send hours to your QuickBooks Desktop account.

Feature limitations:

  • Job & costing information cannot be sent to Quickbooks Desktop. This includes jobs, projects, customers, tasks, and department information. 
  • The QuickBooks Desktop Importer will only send time to the default payroll items in QuickBooks Desktop. Your payroll items must be labeled as the following: Hourly, Overtime (x1.5) hourly, Double-time hourly, Triple-time hourly, Hourly Vacation, Hourly Holiday, Hourly Sick, and Hourly Personal.
  • We do not send over salary hours at this time, only hourly payroll items will be sent to QuickBooks Desktop.
  • We are not compatible with Contractor Editions of QuickBooks Desktop 
  • The Import tool is only compatible with Microsoft-based computers; no tool is available for MAC users. 

Setup

Download OnTheClock Import Tool

  1. Step 1: Download and install the importer tool.
  2. Step 2: Check that your employees’ names in OnTheClock match the information in your Quickbooks account.
  3. Step 3: Remove any custom time card column names from your Time Clock Advanced Settings.

After downloading the QBD Importer tool follow the prompts. You may encounter a “Windows protected your PC” screen , select “Run,” to complete the installation. After installation is complete you will have an icon on the desktop that says, “OnTheClock.com Importer”. To Launch the importer tool successfully you will need to have a QBD instance open. 

Setting Up QuickBooks

  1. Step 1: In Quickbooks, navigate to the Employee Center.
  2. Step 2: Double-click on an employees’ name.
  3. Step 3: Check the box labeled “Use time data to create paychecks.”
  4. Step 4: Under “Earnings,” ensure all item names are default.

  1. Step 5: Repeat for each employee.
  2. Step 6: Navigate to “Edit,” then “Preferences.”
  3. Step 7: Select “Time and Expenses.”
  4. Step 8: Check “Yes” under “Do you track time?”

What to Expect

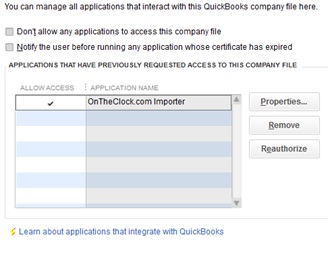
Check to ensure that your QuickBooks desktop account allows access to the OnTheClock.com Importer application.

  1. Step 1:  Click file and select preferences.
  2. Step 2: Go to "Integrated Applications."
  3. Step 3: Click the tab "Company Preferences."
  4. Step 4: Ensure "allow access" is checked and the application name "OnTheClock.com Importer," is listed.
  5. Step 5: Click Ok.

Importing

  1. Step 1: Log in to your OnTheClock account.
  2. Step 2: Navigate to Time Cards.
  3. Step 3: Set your pay period and review your time card entries.
  4. Step 4: Click “Export CSV” to download time card data.
  5. Step 4: Launch Quickbooks.
  6. Step 5: Launch the QuickBooks Importer Tool.
  1.  
    Step 6: In the importer, browse for and select your file.
    Step 7: Review your time card data.

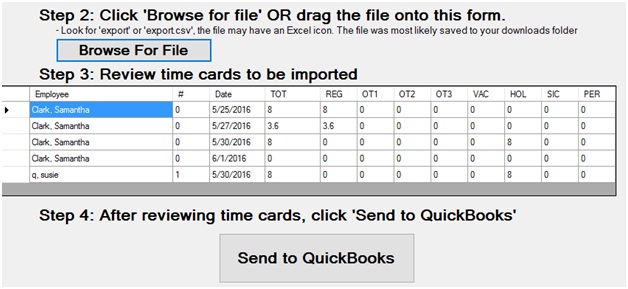
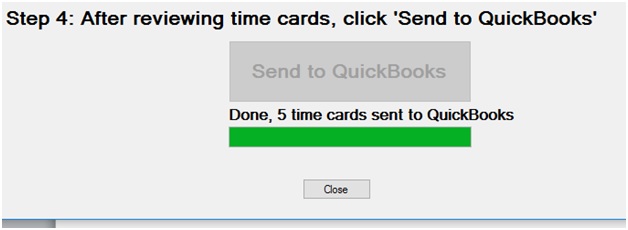
  2. Step 8: Click “Send to QuickBooks.”
  3.  
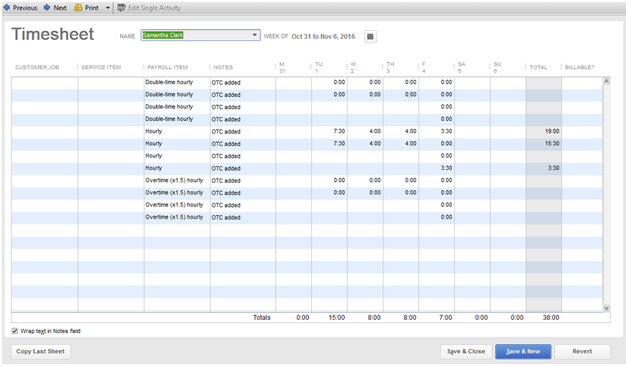
    Step 9: In QuickBooks, click “Enter Time,” then “Use Weekly Timesheet.”
    Step 10: Select the employee you’d like to view.
    Step 11: If the import is successful, it will say “OTC added” in the “Notes” field.

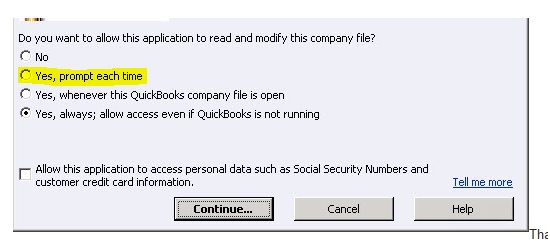
Multiple Company Account 

If you are running multiple company accounts, you’ll need to use single user mode to import hours into QuickBooks. To do this, launch the importer tool, and switch your setting to “Yes, prompt each time.”


Troubleshooting

A
Check to make sure that you have "use data to create paychecks" marked off on the employee info in your QuickBooks account. Next, be sure all your payroll items listed match the default items in this article above.
A
You can track 1099 employees in your OnTheClock account, however, we do not sync hours over to 1099 employees inside of QuickBooks, you would need to enter their hours manually.
A
The importer tool will not open if you do not have your QuickBooks desktop account open. If you are experiencing a COM class error try downloading our QBD driver here.
A
Check your advanced settings in OnTheClock and change your time card column names to be the default names from OnTheClock.
Need more help?
Submit a ticket

What's Next

QuickBooks Online

Learn how to connect your OnTheClock account to QuickBooks Online.

Gusto Integration

Learn how to connect your OnTheClock account to Gusto.

Payroll Providers

Learn how to connect your OnTheClock account to other payroll providers.